Light Painting Photography Ideas: Easy Tips to Get Started
Light painting photography is a captivating technique that merges art with photography, allowing you to create stunning visuals by using light as your paintbrush. In this article, we will explore what light painting photography is, what you need to get started, tips for beginners, creative ideas for your light painting projects, and how to edit your photos in post-processing.
What Is Light Painting Photography?
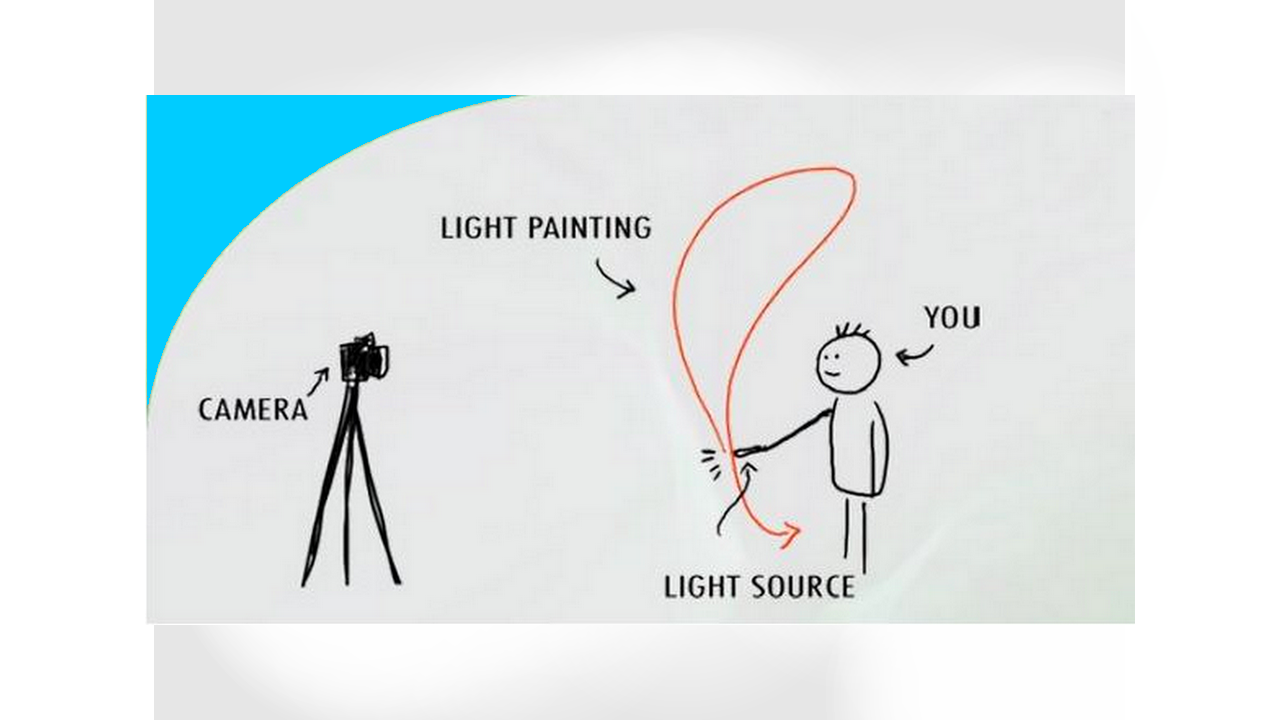
Light painting photography is a technique where a light source is moved in a dark environment while the camera's shutter is open for an extended period. This allows the light to "paint" trails and shapes in the air, resulting in mesmerizing images. The concept dates back to the early 20th century when artists began experimenting with the idea of using light as a medium.
The technique can be applied using various light sources such as flashlights, sparklers, LEDs, and even smartphone screens. The outcomes can range from abstract patterns and shapes to illuminated landscapes and portraits. One of the most exciting aspects of light painting is its flexibility; you can use it to express your creativity in countless ways.
Light painting photography not only requires a basic understanding of photography principles, like exposure and shutter speed, but it also allows for creative experimentation. Artists can use colors, shapes, and movement to convey emotions or tell stories through their images, making light painting a unique and enjoyable form of artistic expression.
What Do I Need for Light Painting Photography?
Getting started with light painting photography requires minimal equipment, making it accessible to almost anyone interested in exploring this art form. Here’s a list of essential tools and materials you will need:
-
Camera: A DSLR or mirrorless camera is ideal, as they allow you to control settings like shutter speed and aperture. While smartphone cameras can be used, they may not provide the same level of control.
-
Tripod: Since light painting involves long exposure times, a stable tripod is crucial to prevent camera shake and ensure sharp images.
-
Light Sources: This can include flashlights, LED lights, glow sticks, sparklers, or even your smartphone’s flashlight. Experiment with different colors and shapes to achieve various effects.
-
Remote Shutter Release or Self-Timer: Using a remote shutter release helps prevent camera shake when pressing the shutter button. If you don’t have one, you can use the camera’s self-timer feature.
-
Dark Environment: A location with minimal ambient light is essential for light painting. Look for dark outdoor settings or dim indoor spaces to achieve the best results.
-
Editing Software: Post-processing can enhance your light paintings. Programs like Adobe Photoshop or Lightroom allow you to adjust brightness, contrast, and colors.
-
Creativity: Finally, your imagination and willingness to experiment are the most important tools you’ll need.
By gathering these materials and understanding their roles, you’ll be well-equipped to begin your journey into the world of light painting photography.
How to Light Paint for Beginners
Light painting can seem daunting at first, but with a few simple steps, you can create beautiful images. Here’s a step-by-step guide to help beginners get started:
-
Choose Your Location: Select a dark place where you can experiment without disturbances. Ensure the area has enough space to move around freely.
-
Set Up Your Camera: Mount your camera on a tripod and set it to manual mode. Start with a low ISO (100-400), a wide aperture (f/8 to f/16), and a long exposure time (10 to 30 seconds). You may need to adjust these settings based on your specific environment and the amount of light you’re using.
-
Plan Your Composition: Before starting, visualize what you want to create. You can sketch your ideas or practice moving the light in the air to get a feel for the patterns.
-
Use a Remote or Self-Timer: Set your camera to take a photo while you move your light source. Using a remote shutter release or self-timer will help you avoid camera shake.
-
Start Painting: Once you’re ready, press the shutter and begin moving your light source. Experiment with different speeds and movements. You can create straight lines, circles, or intricate patterns.
-
Review and Adjust: After taking a few shots, review your images. Adjust your camera settings, light movements, and compositions based on what you see. Don’t be afraid to make mistakes; they often lead to the most creative results!
-
Practice Makes Perfect: Like any other photography technique, practice is key. Keep experimenting with different light sources, settings, and locations to develop your unique style.
Light painting is about having fun and discovering your creativity. With patience and practice, you'll quickly improve your skills and create stunning images.
5 Light Painting Ideas
-
Light Trails: Use a flashlight or LED light to create light trails in a dark environment. Move the light in circular or zigzag patterns while the camera captures the movement. You can experiment with different speeds and colors to create dynamic effects.
-
Silhouette Portraits: Position a subject in front of a dark background and illuminate them with a light source while exposing the shot. This creates an intriguing silhouette effect, allowing for dramatic and artistic portraits.
-
Writing with Light: Use a small flashlight to "write" words or draw shapes in the air. This technique requires practice to achieve clarity, but it can result in striking images that convey a message or tell a story.
-
Starry Night: Create the illusion of a starry sky by using a small light source and moving it in a circular motion to simulate stars. Capture this against a dark backdrop to achieve a night-sky effect.
-
Patterns and Shapes: Use different light sources to create geometric shapes and patterns. You can also involve your body by moving through the frame with the light source to create interesting effects and dynamic compositions.
These light painting ideas can serve as inspiration for your own projects. Feel free to adapt them or combine multiple concepts to create unique images.
How to Edit Light Painting Photos in Post-Processing
Editing plays a crucial role in enhancing light painting photographs. Here’s how to get the most out of your images during post-processing:
-
Import Your Photos: Begin by importing your images into your chosen editing software, such as Adobe Lightroom or Photoshop.
-
Basic Adjustments: Start with basic adjustments like cropping, straightening, and correcting exposure and white balance. Aim for a balanced image that highlights the light painting without losing important details.
-
Enhance Colors: Use the saturation and vibrance sliders to make the colors of your light painting pop. Adjust individual color channels to emphasize specific hues.
-
Contrast and Clarity: Increase contrast to add depth to your images. Adjust clarity to enhance details and make the light trails stand out more.
-
Sharpening: Apply selective sharpening to enhance the details of the light trails while avoiding noise in the dark areas of your image.
-
Layering: If using Photoshop, consider layering multiple light painting images for a more complex composition. Experiment with blending modes and opacity to create unique effects.
-
Final Touches: Apply finishing touches such as adding a vignette to draw attention to the center of your image or adjusting the brightness and contrast for the final polish.
-
Save and Share: Once you’re satisfied with your edits, save your images in high-resolution formats for printing or sharing on social media.
Editing can transform your light paintings into stunning works of art. With practice, you’ll develop a keen eye for adjustments that enhance your unique style.
By following these tips and techniques, you'll be well on your way to mastering light painting photography. Remember, the key to creating captivating images lies in experimentation and creativity. Happy painting


Comments (0)